
Home » Precast Connector Resources »
A compression connector holds a watertight seal for decades when it goes in right, and it goes in right when the mandrel matches the connector, the connector is mounted correctly, and the finished structure is verified. Most field problems trace back to one step on this page that got skipped. This is the same inspection sequence we recommend to every precaster running A-LOK PREMIUM, X-CEL, and STM connectors.
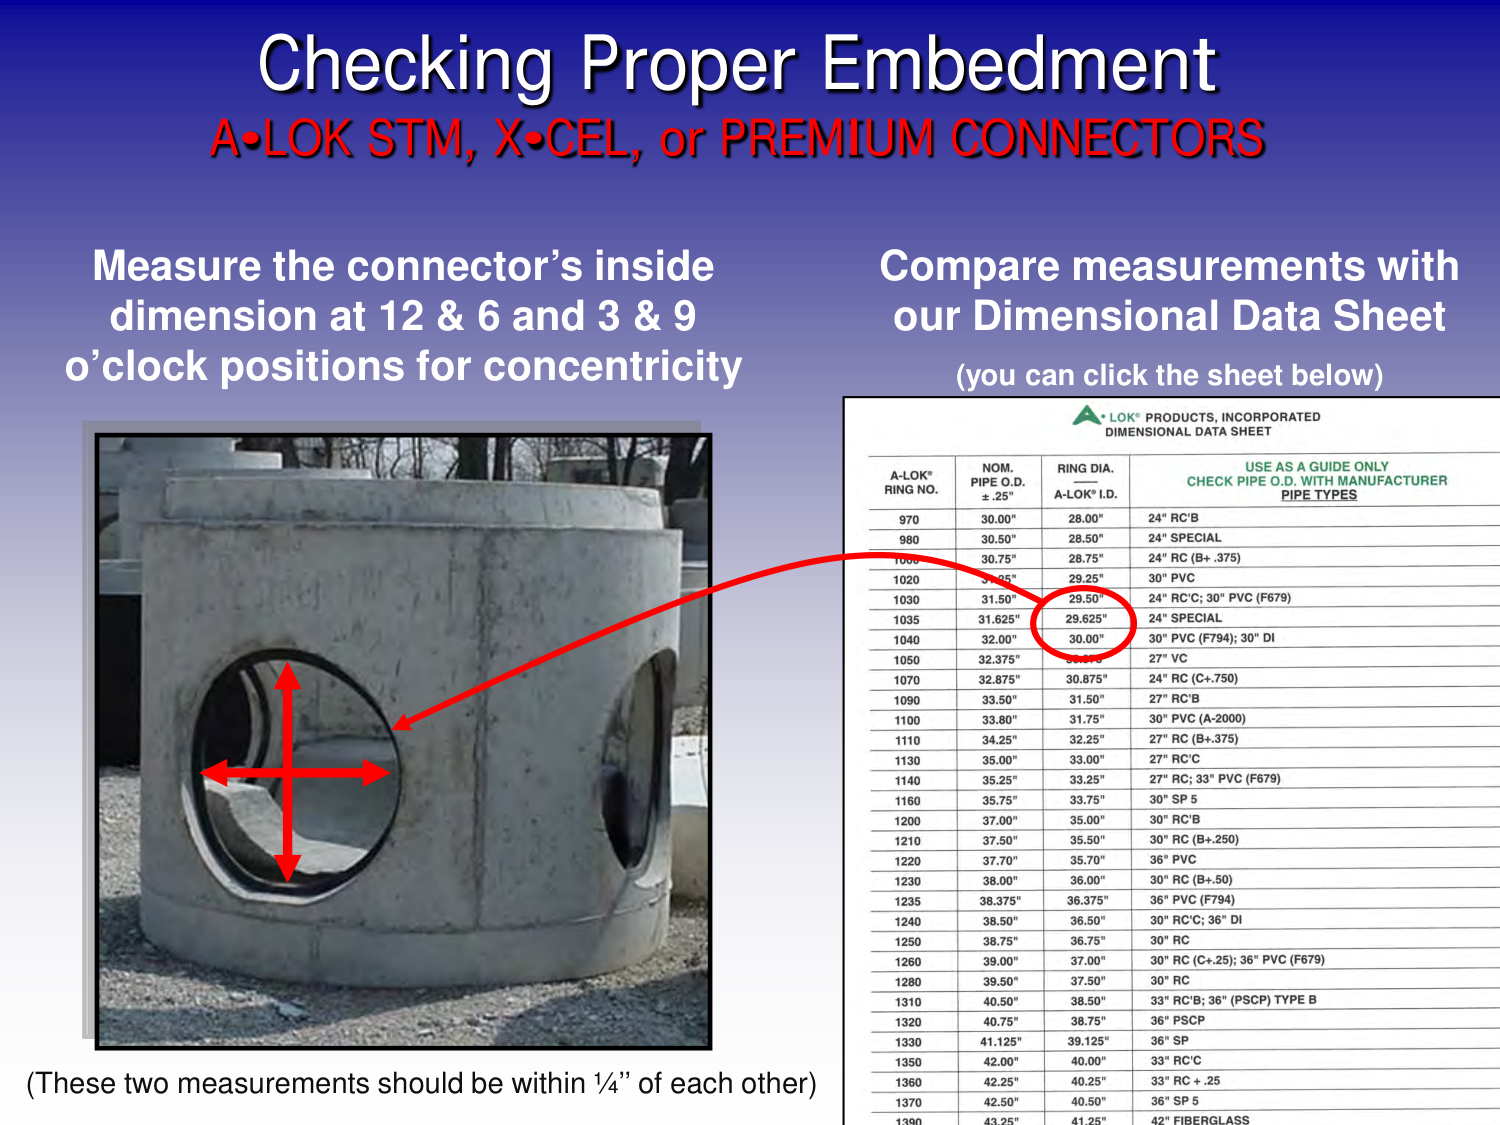
Match the connector and mandrel by part number on the A-LOK Dimensional Data Sheet, confirm the mandrel is round within a quarter inch before the pour, then measure the connector’s inside dimension at the 12 and 6 and the 3 and 9 o’clock positions after stripping. Those two measurements should be within a quarter inch of each other. That is what keeps compression even all the way around the pipe.
What do you check before the pour?
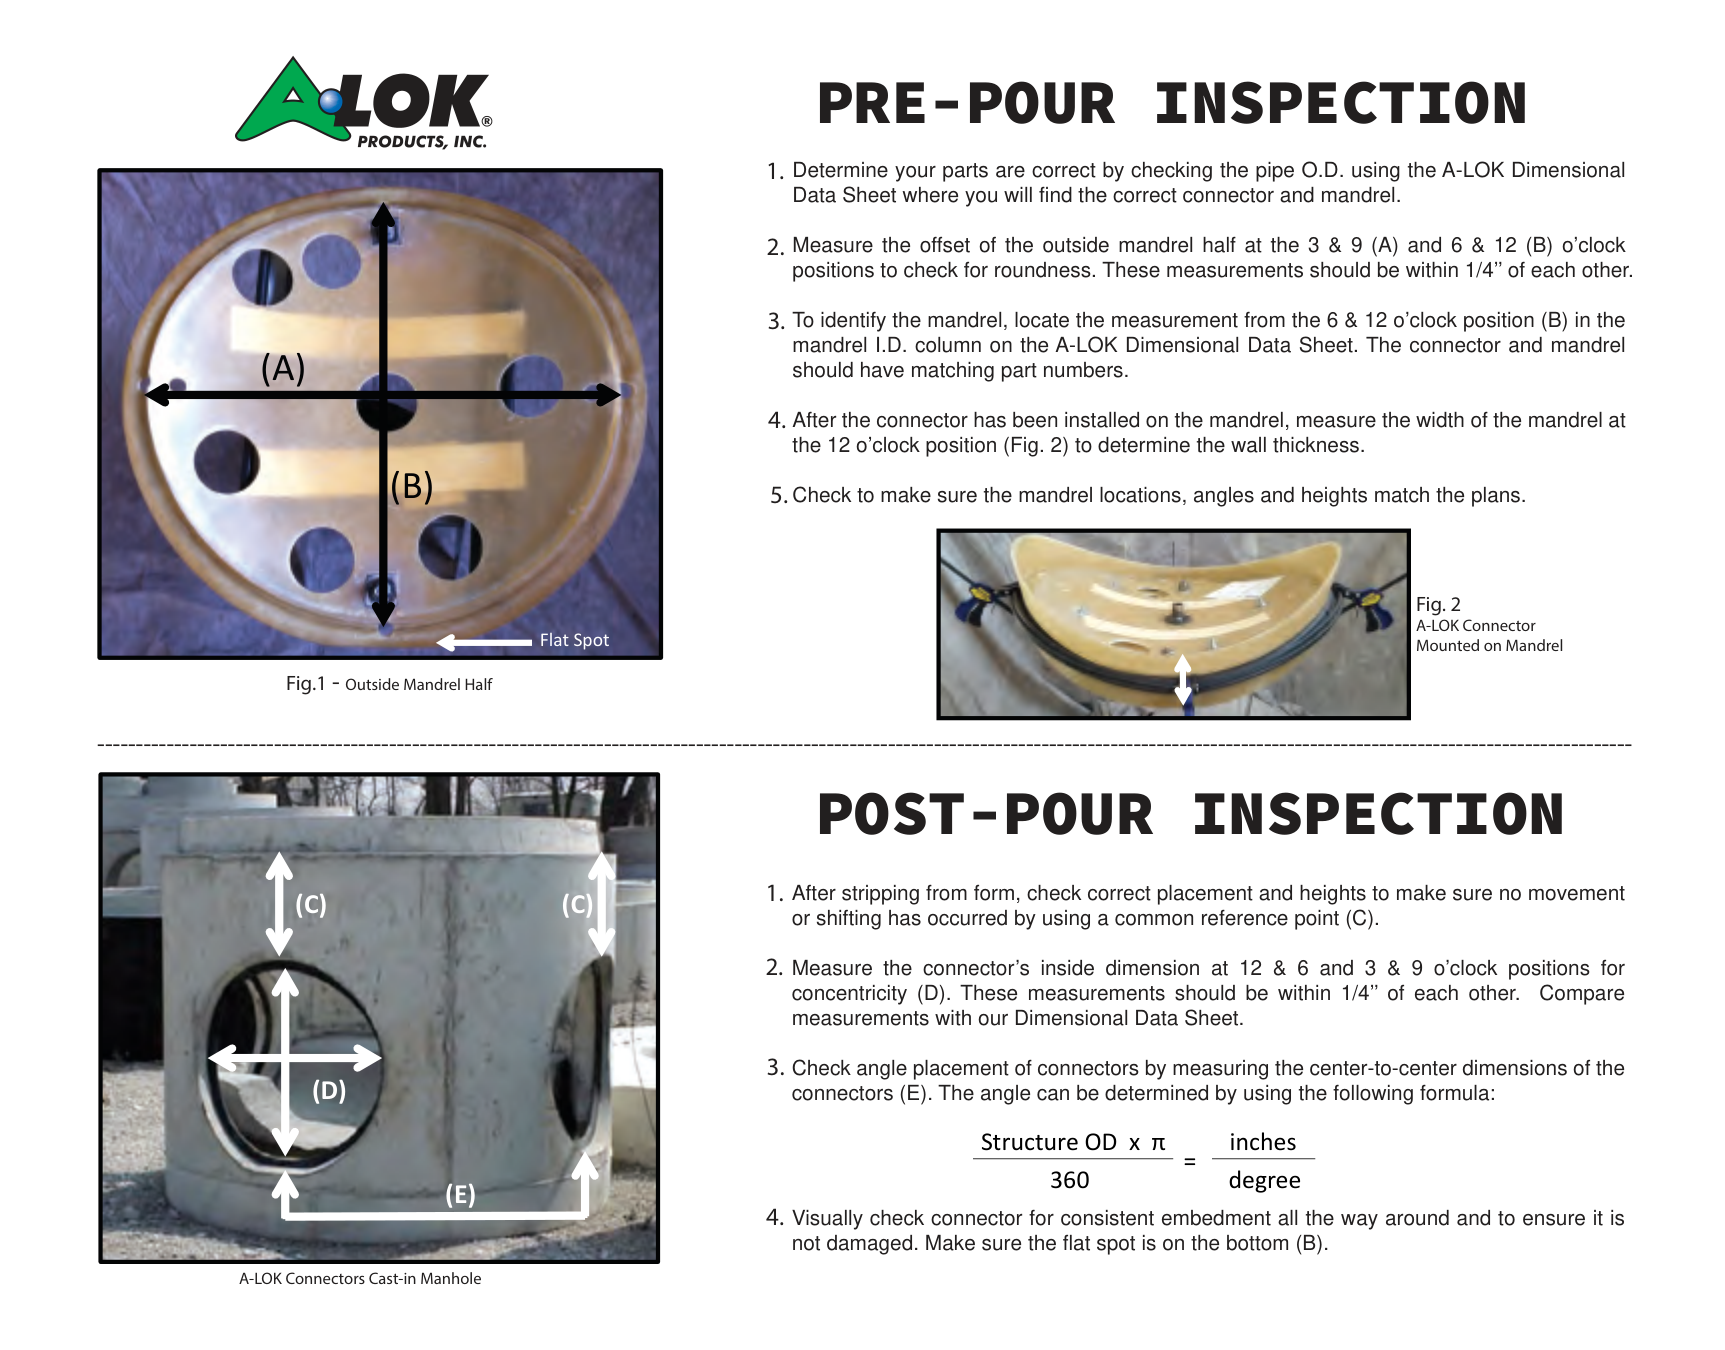
- Confirm the parts match the pipe. Check the pipe O.D. against the Dimensional Data Sheet, which pairs every pipe with its correct connector and mandrel. Connector and mandrel should carry matching part numbers.
- Check the mandrel for roundness. Measure the offset of the outside mandrel half at the 3 and 9 o’clock positions and at the 6 and 12 o’clock positions. The two measurements should be within a quarter inch of each other.
- Identify the mandrel. Take the 6 and 12 o’clock measurement and find it in the mandrel I.D. column of the Dimensional Data Sheet to confirm you have the right mandrel for the job.
- Confirm wall thickness. After the connector is mounted, measure the width of the mandrel at the 12 o’clock position.
- Verify locations against the plans. Check that every mandrel location, angle, and height matches the drawings before concrete moves.
How do you mount the connector on the mandrel?
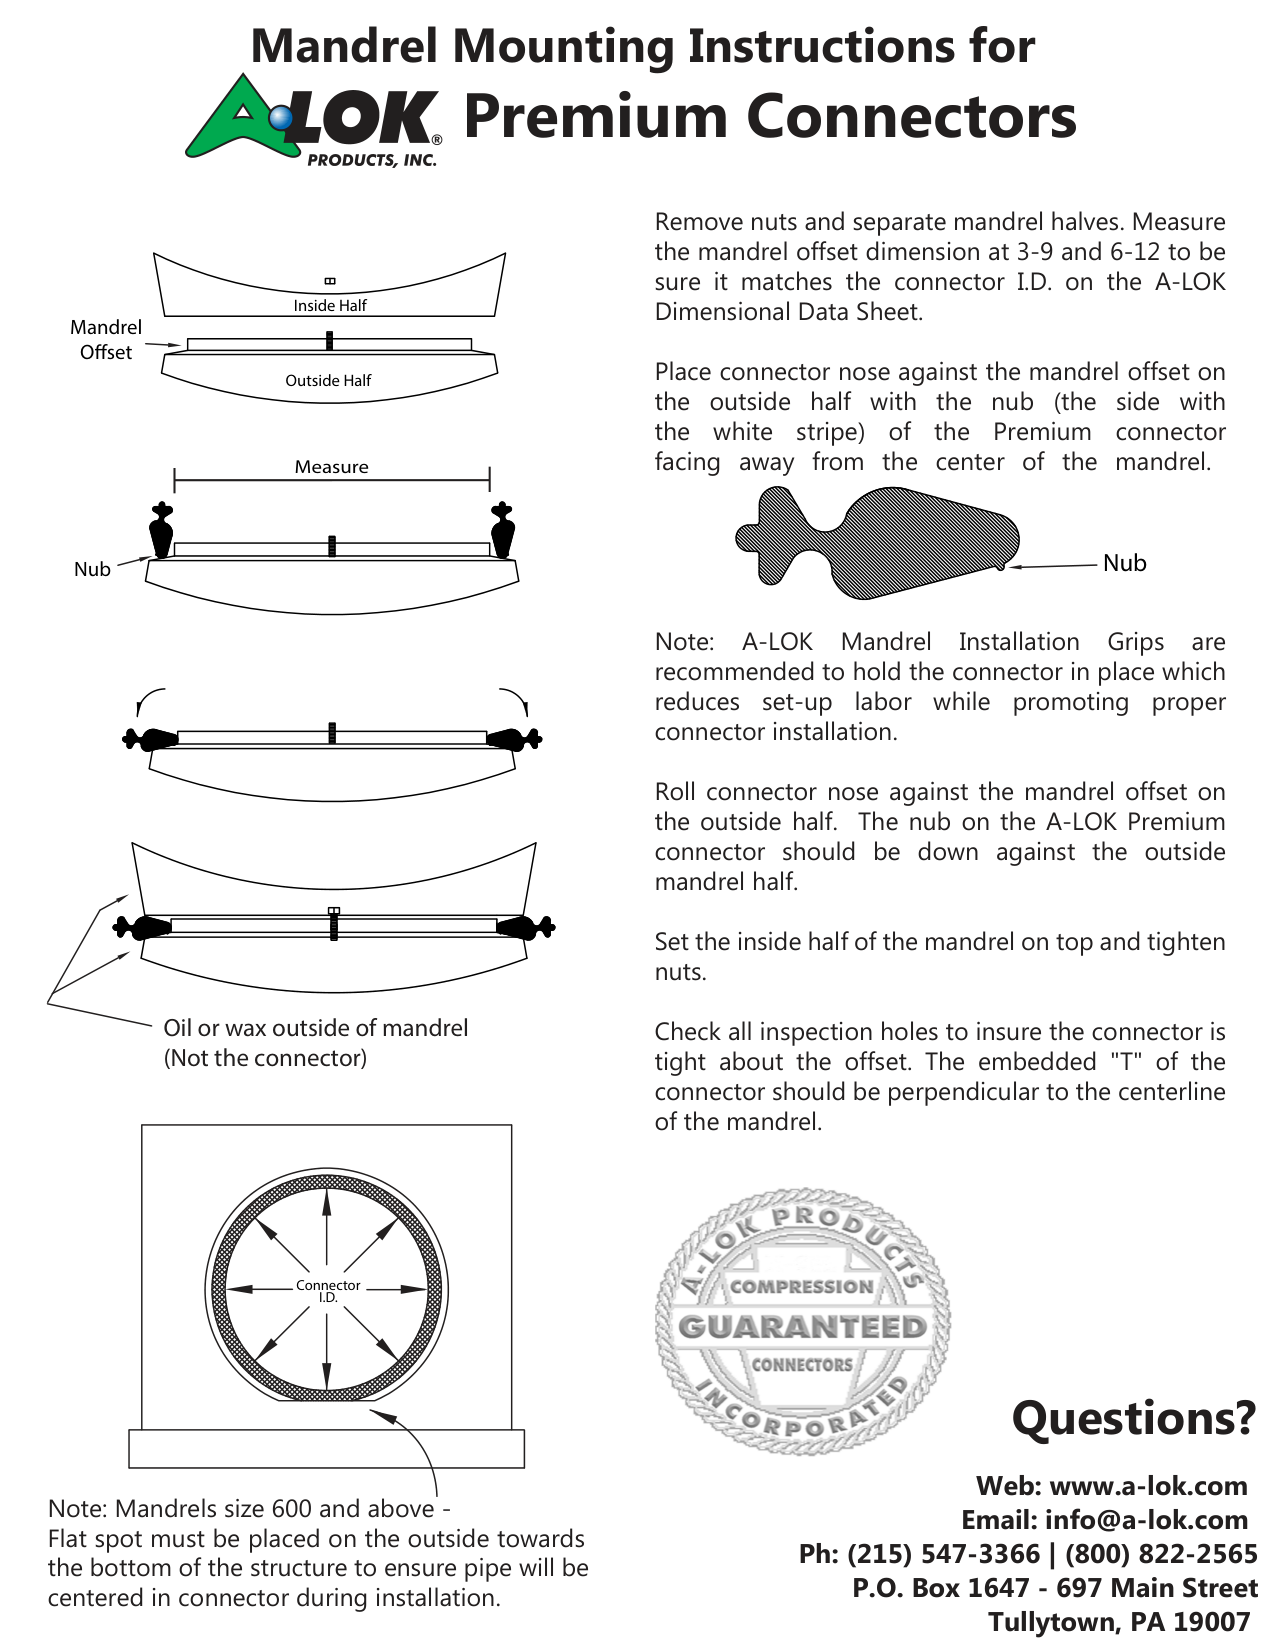
Separate the mandrel halves and place the connector nose against the offset on the outside half, with the nub side of a PREMIUM connector, identified by the white stripe, facing away from the center of the mandrel. Roll the connector nose against the offset so the nub sits down against the outside mandrel half, then set the inside half on top and tighten. Check every inspection hole to confirm the connector is tight around the offset, and confirm the embedded T of the connector sits perpendicular to the mandrel centerline.
Two details that matter more than they look:
Oil or wax the outside of the mandrel only. Never the connector.
Mind the flat spot. On mandrel sizes 600 and above, the flat spot must face the outside, toward the bottom of the structure, so the pipe centers in the connector during installation.
Installation grips are recommended to hold the connector in place. They reduce setup labor and help keep the connector seated correctly while the mandrel halves are assembled.
What do you check after the pour?
- Check for movement. After stripping the form, verify placement and heights from a common reference point to confirm nothing shifted during the pour.
- Measure for concentricity. Measure the connector’s inside dimension at the 12 and 6 o’clock positions and at the 3 and 9 o’clock positions. The two should be within a quarter inch of each other. Compare both against the Dimensional Data Sheet.
- Verify angle placement. Check connector angles by measuring center to center between connectors. Inches per degree for your structure is the structure outside diameter times pi, divided by 360.
- Inspect embedment. Visually confirm the connector is embedded consistently all the way around, is undamaged, and that the flat spot is on the bottom.
- Confirm invert elevations. Check invert elevations from your common reference point so the structure arrives on site matching the plans.
A quality assurance worksheet that records manhole number, pipe penetration degree, invert elevation, and type for each structure turns these checks into routine instead of memory work. Ask us for a copy.
Why does the quarter inch tolerance matter?
Concentricity within a quarter inch is what keeps compression even all the way around the pipe. An out-of-round opening loads one side of the connector more than the other, and uneven compression is where leaks start. Two tape measurements after stripping is the cheapest leak prevention on the entire structure.
What do you compare your measurements against?
The A-LOK Dimensional Data Sheet. It lists the correct pipe outside dimensions, connector part numbers, and matching mandrel I.D. values for every pipe size and type, and it is the reference both the pre-pour and post-pour checks work from.
Frequently asked questions about connector installation
What is the most skipped step?
The post-pour concentricity check. A structure that measures round at the mandrel can still shift during the pour, and the only way to know is to measure at 12 and 6 and at 3 and 9 after stripping.
Where does the flat spot go?
On the bottom, facing the outside of the structure, on mandrel sizes 600 and above. It ensures the pipe centers in the connector during installation.
Should the mandrel or the connector be oiled?
The outside of the mandrel only, never the connector.
How do you calculate connector angle placement?
Measure center to center between connectors. Inches per degree equals the structure outside diameter times pi, divided by 360.
What if a measurement is out of tolerance?
Call us before the structure ships. Depending on the dimension there are options, and catching it at the plant is always cheaper than catching it in the ground.
Data Sheets · How to Order Precast Connectors and Accessories · Compression connectors · Back to Precast Connector Resources